This is the second post of a six posts series regarding creating a map editor software for an RTS game. If you haven’t already, check out the first post of the series.
So, I had a nasty cliff hanger in the previous post, which made me feel sorry for the reader, and thus I decided to write the second part ASAP! … Actually, I couldn’t care less, this is just part of my day.
Plists:
So, picking up where we left off, how can plists help us achieve the demanding capabilities in the map editor?! Before we embark on that journey, let use make sure the reader (you, basically) know exactly what a plist is (The first time I ever used a plist was through Xcode UI, and I thought it was magic. It seemed like this file that had a UI of its own. That’s when I went to Jim and told him, “Hey, check plists out, they are freaking amazing!”, Jim:”What? They are just XML files, no?”, Me:”XML? Pfft, no! They are a lot more than that!”… Boy, was I wrong):
So, a plist is subset of an XML file :). Its format is defined by Apple, that is to say Apple “invented” this format a long while back, and it is still very popular and used a lot in the Mac world. The cool thing about them is that they are displayed with a nice UI on Mac, using Xcode. Ultimately, they are XML files!!
What is so special about these XML files? They are restricted to contain only certain types of data:
- Arrays
- Dictionaries (Maps)
- Strings
- Integers
- Reals
- Booleans
- Dates (not the food, timestamps)
- Data (arbitrary binary data)
The plist has a single root object, which can be either a dictionary or an array, and this root objects contains the rest of the nodes. So, the root can be an array, with has 4 dictionaries, and the first dictionary has a key “name” with a value of “Mutta”, and “pet” with a value of “Apo”, and so on…
You can read more about plists here.
Give Data the Keys:
Now that we all understand what plists are, it’s time to see them in action! Previously, I explained the entities that make up the Map Editor, now we shall dissect the entities!
-
Object Properties: * UID (int): automatically generated unique ID for referencing * Entity (String): e.g. militia_unit_lvl01, critter_spider_lvl04, … etc. * Position (Point): position of the object * Size (Size): the size the object occupies, calculated in tiles (2x2, 5x5, …)
-
Zone: * UID (int): automatically generated unique ID for referencing * Position (Point): position of the zone * Size (Size): the size the zone occupies
-
… and so on.
The issue here is, these object properties are not fixed (in the long term)! Even though we define a zone as a UID, position and size, there is a possibility that the game designer would want to something more interesting with the zones in the future, which would mean reworking the Map Editor, adding code to the game engine to load the new properties, use them, … etc. SUCH A PAIN!! Good thing we have plists…
(UPDATE: I was actually requested to add a commander_id parameter to the object’s structure yesterday. Commander ID would signify whether that object is a player’s object, an enemey object, an allied object, or of course, neutral. All it took was 5 seconds to add that parameter to the plist, and run a script!)
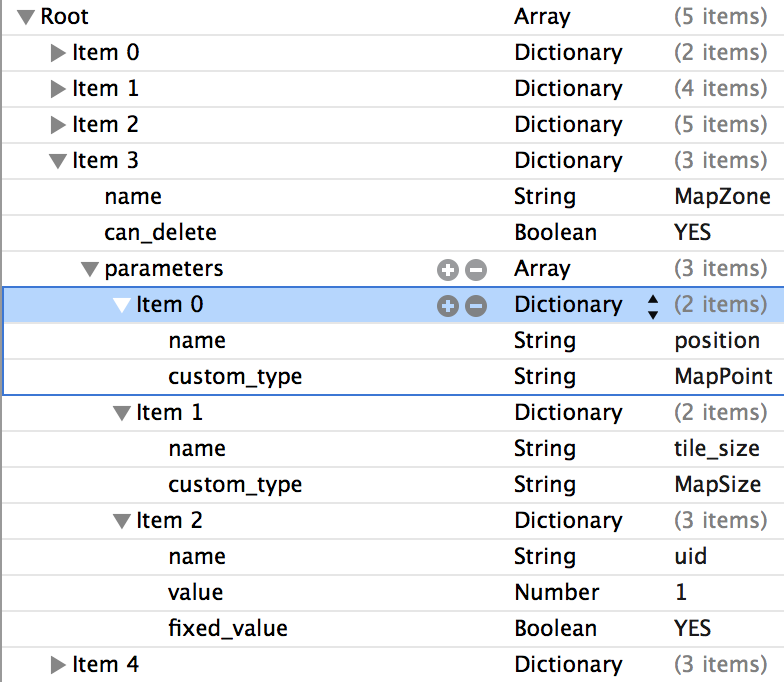
Instead of actually writing code that define these structures, we use plists! (Yay, finally we actually explain the plists role). We basically create a plist that contains prefabs. (A prefab is simply a well defined structure that we can clone (instantiate) and use as an object instance.) Actually, you can think of a prefab as a class. For example, here is the structure I created for our Map editor:
Pretty straightforward. The plist is an array of dictionary. A dictionary defines a prefab. A prefab has 2 essential properties:
- Name: in order to fetch the prefab.
- Parameters: the variables that belong to the prefab. A parameter has 2 required properties:
- Name
- Value or custom_type(if value is used, we can the type by checking the value type (string, int, … etc.). Or, we can use the
custom_typekey to assign our custom types to the prefab.
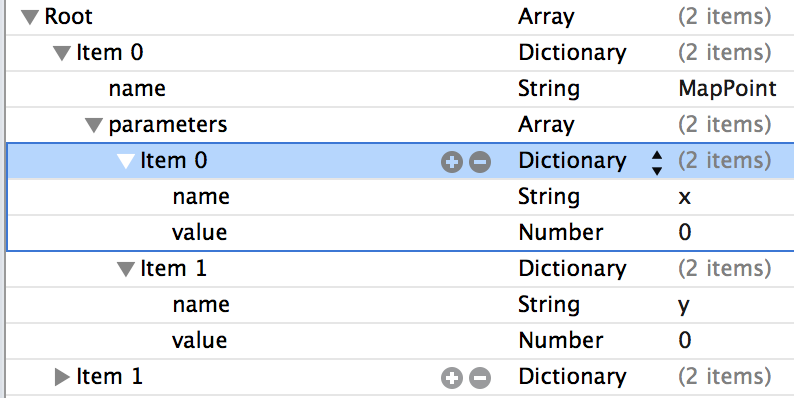
As you see above, I am using a custom_type key, where the value for that key is MapPoint then MapSize. These custom types are actually just referencing custom type prefabs in another plist!! These prefabs have a very similar structure:
Exactly the same structure. This is crucial, as we will see later.
There is one important note here:
In the ideal world, these plists are actually too verbose. For example, I am creating an array of prefabs, and each item in the array has a name, parameters and other stuff. Even the parameters are an array where an item is a dictionary with a name and other keys… It would’ve been great if I could just made the root object a dictionary and the key is the name, and the value is another dictionary with the other keys! e.g.:
instead of using:
root : Array
|-> Item : Dictionary
....|-> name: String = MapZone
....|-> parameters: Array
........|-> Item: Dictionary
............|-> name: String = position
We use:
root : Dictionary
|-> MapZone : Dictionary
....|-> parameters : Dictionary
........|-> position : Dictionary
Unfortunately, as you will see later, I use the explained verbose structure to support NSTreeController, which requires your structure to have an “array of children”. I won’t say more, tune in next time!!
Conclusion
Now that we have all our data set up and good to go, we shall explore how to translate these plist files into a functional UI as well as a parser for the engine! Remember, the ultimate goal is to show the user these entities in the map editor and allow him to manipulate the data, export a map, and load that map in the engine, all in a data driven way, defined by these plists!! Click here to go to the third part of this series.

