This is the third post of a three post series regarding creating a map editor software for an RTS game. If you haven’t already, check out the first and second posts of the series.
Recap:
Before we delve into the finale, let’s see what we saw, read what we read, smell what we smelled… OK, we hopefully didn’t smell anything, actually. RECAP!
First, we defined the main constraint of the Map Editor, namely, being easy to iterate on. We said that using a scripting language that binds to the engine would be ideal, since the interpreter can dynamically load the scripts at runtime, and the code written would be in a scripting language, aka trivial. Alas, that approach was not possible in our case.
That is when we thought of the code-generating script idea. Using a script, we can at least control all the data structures for the Map Editor entities using a plist file. The script would load the file, and generate C++ code that loads and uses these data structure. We will look in detail on how that happens today. Another interesting part could be exploring how the Map Editor app, written in Objective-C, handles it. This series might be a 4 part series after all…
Python, hisssssss!
This part is what I was REALLY looking forward to. If the post was a Machboos, this is where the meat is. This part was really exciting for me beacuse: 1 - I’m a n00b python developer, and python’s awesomeness stunned me. 2 - This script can be thought of an automation kinda thing, and automation is always awesome. (And it is what one of my friends always resorts to when faced with a tedious problem!)
Let us go ahead and tackle the first and most basic problem. We have a plist with structured data, and we want to convert that to actual C++ code (structs, in this case). We shall explain this through code. So, let us start the dissection, shall we:
Entry Point
This is where the script’s entry point is. We execute the code below and pass in some parameters, and then… Magic happens.
import argparse
from codegen_cpp import writeStructs

# -- Application begin -- #

parser = argparse.ArgumentParser(description='Generates C++ code from plists.')
parser.add_argument('--plist', metavar='plist', type=str, nargs=1, help='plists that describe the code', required=True)
parser.add_argument('--include', metavar='include', type=str, nargs='+', help='header files to be included')
parser.add_argument('--header', metavar='headerFile', type=str, nargs=1, help='The header file to be generated')
parser.add_argument('--source', metavar='sourceFile', type=str, nargs=1, help='The source file to be generated')

args = parser.parse_args()

writeStructs(args.plist, args.include, args.header, args.source)
Don’t let no nothing intimidate you here. It is a simple use of the argparse library. argparse makes it insanely easy for you to add command line interface to your script. As you see in the code above, a parser is created with a general description, and arguments are then added to the parser. You can specify lots of great option to the arguments, such as if it’s optional or required, number of input variable, the type of the input, … etc. After that, we parse the args, and call an external function. That’s it. Let’s see how this looks like in the terminal output when we execute python codegen_structs.py --help:
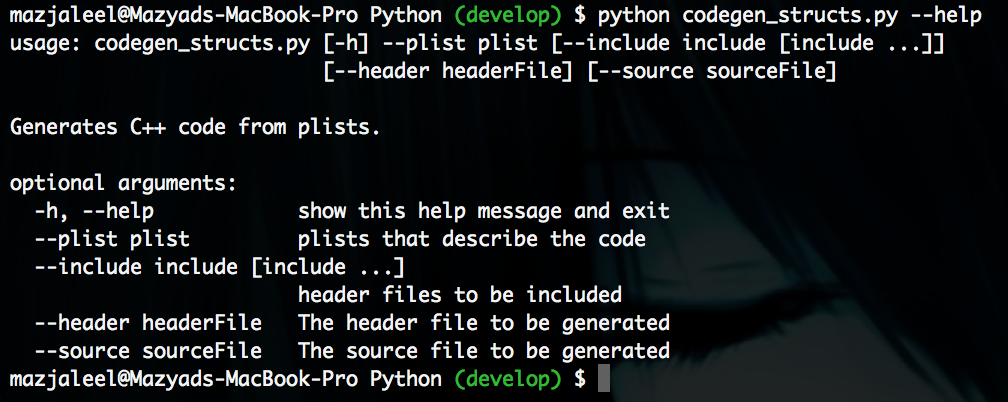
Now that right there is Python rocking out. The language has a built-in library that handles these stuff for you… awesome. Period.
With the technicalities out of the way, what are we trying to achieve here? We are simply providing a command line interface script that takes a list of plist files that contain the data structure of a struct, an input header file (.h), source file (.cpp), and optional includes (
Prepare For Take-Off
Getting excited to see the actual thing that does the conversion? Well, we still have ways to go… Coming up next, how to use the parameters given by the argparse library to get the actual data we need.
# this method can only take one plist file
def writeStructs(plistFiles, includes, outputHeaders, outputSources) :
    # make sure everything is in place
    assert (plistFiles and outputHeaders and len(outputHeaders) == 1), "writeStructs expects headers and plists"
    # headers is passed in as a list with one item
    header = outputHeaders[0]
    headerContents = ""
    sourceContents = ""

    ...

    plistFile = plistFiles[0]
    alltypes = plistlib.readPlist(plistFile)

    for atype in alltypes :
        structName = atype["name"]
        params = atype["parameters"]

        ...

        headerContents += generateStructHeader(structName, superStruct, params, userContent) + '\n'
        sourceContents += generateStructSource(structName, superStruct, params) + '\n'


    writeHeader(headerContents, includes, header)

    if (outputSources != None) :
        writeSource(sourceContents, outputSources[0], header)
Starting from the top, we want to make sure we are getting what we expect. The argparse library actually generates a list of items for each argument, even if the argument is specified as a single item. For example, we specified before that [–header] is an argument with nargs [number of args] as 1. Even with that, argparse will send a list with one item in it, which is the header file. Let’s take a quick detour and see an example:
$ python codegen_struct.py --plists p1.plist p2.plist --header header.h
# the code above will make argparse return:
# args.plists = ['p1.plist', 'p2.plist']
# args.header = ['header.h']
It should be pretty clear by now how argparse provides you with the user’s input. With that in mind, you can see how I retrieve the header file name by accessing the zero index of the header list directly. Then, we do the same thing for the plist files. Honestly, though, I could add a for loop over the plistFiles array, to support multiple plist files, but I didn’t. After that, I read the plist file using plistlib, which is awesome, because it returns an object representation of the plist content. In this case, it will return a list of dictionaries. I call each dictionary “aType”, and get the “name” (string), “parameters” (List), and pass those (and other arguments I stripped out for brevity sake) to the generateStructHeader and generateStructSource functions.
I explained the previous block of code in one shot and quickly because there isn’t really much to it. The best take away is how easy it is to deal with plist files in Python, but that’s about it.
The Secret Sauce
In the following code, we will see exactly how the code is generated. Without further ado, let’s dive right into it:
typeMapper = {
    "int" : "int",
    "str" : "std::string",
    "float" : "float",
    "double" : "double",
    "bool" : "bool"
}

...

def generateStructHeader(structName, superStruct, parameters, userContent) :
    content = ""
    for ivar in parameters:

        name = ivar.get("name", None)
        value = ivar.get("value", None)
        custom = ivar.get("custom_type", None)
        cppignore = ivar.get("cpp_ignore", False)

        ivarLine = ""
        # ignore this key, we don't want to generate it
        if cppignore:
            continue
        # If we have a value, get its type from the mapper
        elif value is not None :
            ivarLine = "\t"+typeMapper[value.__class__.__name__]
            ivarLine += " "+name+";\n"
        # If it's a custom type, just use the name as the type
        elif custom is not None :
            ivarLine = "\t"+custom
            ivarLine += " "+name+";\n"

        content += ivarLine
From the top, we define a global dictionary that can map the Python type to the C++ type. We will see how it is used in a bit. So, in the generateStructHeader, we loop over the parameters, such as each parameter is suppose to be an instance variable. We use Python’s get(key, default) to access the dictionary, which helps us get a default value if the key we are trying to access isn’t part of the dictionary. If the cpp_ignore key is defined, then this parameter should not be exported, so we continue. Else if the value is not None, we use the previously mentioned type dictionary to get the C++ type for that value, and then append the name of the ivar. Finally, if it is a custom type, we trust that this custom type will be defined somewhere, so we declare the variable as the custom type value, and append the name. You can clearly see the custom_type value in the previous post about plists, where custom_value = “MapPoint”. So, it will be declared as “MapPoint position;”
This wasn’t the end of the function, there is more. After we built the code for our ivars above, we will now see how we create the whole struct:
# load the template file
structTemplateFile = open("struct_template.txt", "r")
structTemplateFmt = structTemplateFile.read()
structTemplateFile.close()

# if the struct has a super class
if superStruct is not "" :
    superStruct = " : "+superStruct

# this is simply the constructor
content += "\n\t"+structName+"(const Json::Value&);\n"

structDef = structTemplateFmt.format(
    structName=structName,
    superStruct=superStruct,
    structVars=content,
    userContent=userContent)

return structDef
Simpler than you thought? YES! We have a template file for how a C++ struct should look like, we load that, and plug in the data. Take note, though, at line 92 we are adding a VERY SIMPLE constructor that takes a single argument, “const Json::Value&”. This is awesome because one would initially assume that we will create a constructor that takes arguments for all the ivars, but we don’t. We will see why we do that later, and I can assure you, it’s quite awesome.
Let’s take a quick look at the template file:
struct {structName}{superStruct}
{{
{structVars}
#pragma START-{structName}-USERCODE
{userContent}
#pragma END-{structName}-USERCODE
}};
So, we simply plug in the structName, assume superStruct is empty, structVars is the ivars and constructor we generated above, and that’s it! Don’t worry about the #pragma stuff, and userContent. Note, though, how we are using double braces {{, }} to escape the actual braces, because a single brace {} is a python format specifier.
Conclusion
In this post, we concentrated at how the Python script works and generates the C++ code from the plist file. There are still a lot of questions to be answered, especially with the weird constructor shown above as well as how we plan to initialize these structs? What about the implementation of the constructor? I mean, this code will generate the structs, but there has to be code that loads a game map, and instantiate these struct and populate them with data and all that stuff. This is actually all part of the automation process!
I initially thought this would be a three part post, and boy was I far from right. This will probably be a 5 or even 6 part tutorial, where we will explore how the data is displayed in the Map Editor, and then exported and read into the engine. Stay tuned for more!