Introduction
I am very cheap when it comes to money, and the best price plan for iOS CI I could find was at least gonna set me back $70 a month. I thought about buying a Mac Mini to do CI, but it might be painful to maintain and configure.
While browsing game engines recently, I stumbled upon Cocos2d’s CI setup, and they were using a service called CircleCI. I started doing some research about the thing, and that’s how it all started.
![]()
Pricing
Looking at their prices, I was shocked! Build private repos, for free. Sure it has a limit, obviously, but that’s way more than what I need for my own projects.
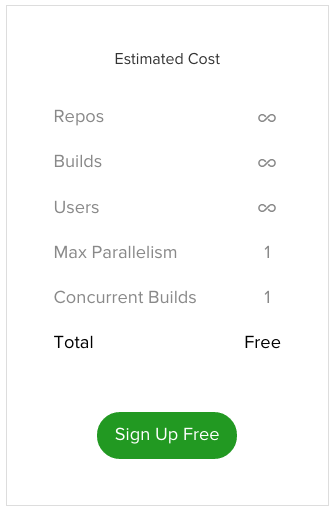
The price plan is “per container”, and a container is basically a parallelized build. So, if you are building one thing at a time, you should be good to go with the free tier!
Inference
This part is pretty cool if you have a simple setup. CircleCI can infer your build settings, and it does a pretty good job at it. As of this writing, it supports Cocoapods powered projects, unit tests with XCTest/Kiwi/KIF, and xctool. The best thing about this is that it tells you:
The guys have put a lot of thought and effort into this.
Granted you might have a bit more complex setup, you can easily look at their config documents to suit your needs. By executing certain scripts before or after certain stages, you can accommodate your needs. More about this in the Gotchas section below.
Arbitrary Code
The best thing is that you can run arbitrary code and easily define that in the config.yml. That may be common in CI environments, but it still impressive every time I use it.
Arbitrary code includes installing tools and configuring dependencies on your environment. For example, I am trying to use shenzhen and xcpretty to distribute builds over hockey app. To do that, here is my config.yml:
dependencies:
  pre:
    - sudo gem install shenzhen
    - sudo gem install xcpretty
Extremely Slick
Lots of work has gone into the UX of the site, since it’s super slick.
A good example is from yesterday while I was trying to generate a build. As I was waiting for the build to start, it was taking a bit too long. While scratching my head at the situation, a message appears on the website itself from CircleCI that they are migrating stuff, and all builds are being queued. That was pretty cool, inlined tech support.
Another form of slickness is how it does lots of work for you, you’d otherwise be doing manually. For example, when you add a github repo, you grant write access to CircleCI, and circle CI creates an SSH key and connects the webhooks to itself, and you are good to go! Part of my CI script is to bump the version and submit it to github, and now that works painlessly.
Other than that, the over all colors and interface is super easy to use and clean. I hardly needed any hand holding to find my way around.
Gotchas
Here are a few things that trip me up, but nothing major:
- CI Skip: You can easily tag a commit to be skipped by CircleCI by adding
[ci skip]anywhere in the commit message. - Code Signing: I am not sure if you can do that or not, but I’ve emailed them about it, and will hopefully post a follow up if it works.
- Submodules: If you have them, you must add the following to your config.yml
checkout: post: - git submodule sync - git submodule update --init - Cocoapods: If you need a certain version, make sure you specify, also in config.yml
machine:
  environment:
    # CocoaPods versions greater than 0.34 require
    # your terminal to be using UTF-8 encoding.
    LANG: en_US.UTF-8
dependencies:
  pre:
    - sudo gem install cocoapods --version 0.35.0
    # CocoaPods sometimes has issues using caches
    # between different versions of CocoaPods.
    - pod setup
    - pod install
Conclusion
This makes you want to write tests and submit PRs just for the sake of looking that those green arrows and statuses on Github!