Introduction
If I were to tell you, today we shall marry CircleCI to HockeyApp, who do you reckon would be the bride, and who would be the groom? Doesn’t really matter actually, as nowadays, that’s not the only allowed typed of marriages!
Enough with the silly introduction, and onto the l00t.
Purpose
CircleCI is an amazing service that provides continuous integration for various projects, including iOS projects.
Continuous integration in its “final boss form” is a service that checkout the latest code, performs some automated changes and formatting, builds the product, runs automated tests on the product, performs post testing actions, and finally deploys the product.
In a typical iOS project, the deployment phase is not necessarily deployment to the AppStore directly, but rather deploying to a distribution platform which can provide the latest builds to your QA team. For all we care, your QA team could be 🐵🐵🐵 that tap all over the screen and get bananas as a reward.
Now, it could easily become a chore if you had to wait for the CI process to complete, before deploying to the distribution platform, hence the purpose of the article. Let CircleCI take care of that distribution.
Code Signing, Provisioning, and Archiving. Oh, My!
First of all, take a look at this superb example of how things should work. The sample project shows how you can distribute TestFlight builds through CircleCI, so with a bit of tweaking and explaining on my end, you should be all set with minimal head-scratching.
Ground Work
Before doing anything else, if you want to commit to making builds on a server, you need to make sure the following checklist is accommodated:
- Device UUIDs registered
- App ID for the product
- Ad Hoc Distribution Provisioning profile
- iOS Distribution certificate
Once you’ve created those in provisioning portal, you’re ready to move to next step.
Exporting
Now, we need to have the required files in one place, and we will use them in a second when we configure the repo. These files can be exported from your keychain on OSX:
-
Apple Worldwide Developer Relations Certification Authority You can search for it in your
loginkeychain, and just export acerfile, call it apple.cer. -
iPhone Distribution certificate Your iOS distribution certificate exported as a
cerfile, call it dist.cer. -
iPhone Distribution private key Your iOS distribution certificate exported as a
p12file, call it dist.p12.
NOTE:
When you export the private key, it will ask you for a password. Take not of that password, we will refer to it later.
Now, either download your mobile provisioning profile file from the portal, or you can find it located at the following path:
~/Library/MobileDevice/Provisioning Profiles
I use the excellent quick look plugin to inspect the files.
Anyway, once you have your hands on the profile, copy it “as is” to where ever you put the previous files.
Setting Up the Repo
Now we are ready to configure the git repository that will be checked out by circle ci.
First, let me be clear:
Here is where I made changes to what the github example has
In the github example, the developer prefers to run a bunch of custom scripts in order to generate an archive, process it, and upload it to test flight. In my case, I decided to simplify these steps as much as possible.
So, with that out of the way, let’s see how can we make this happen:
Xcode
Some changes need to be made to the project itself, first. There must be a build configuration that has the code signing and provisioning profile set manually. In my case, I created a new build configuration, and set up the code signing and previously created provisioning profile:
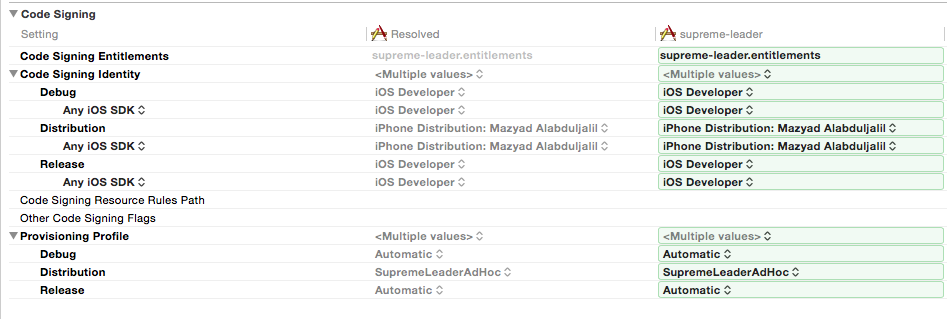
You can use Release if you like, or call it Distribution, just make sure you take note of which build configuration is using the distribution identity.
This means we don’t need the testflight.sh script in the github repo.
Environment
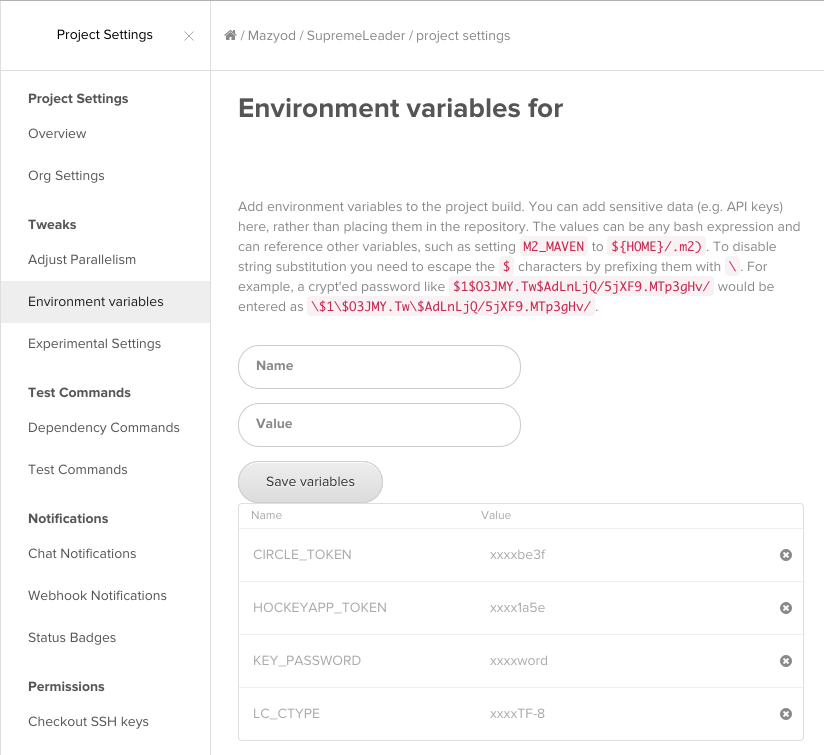
In order to upload your build to hockey, or any other service really, you need an access token. In order to secure the token and conveniently change it through UI, we will set it up through Circle CI project settings.
Remember the exported private key p12 file that you password protected? Remember how I said to take note of the password? Here is where we will use that password, as well.
Just go over to the project settings on circle CI, and set up the environment variables with HOCKEYAPP_TOKEN and KEY_PASSWORD. The hockeyapp token can be generated from the user account settings -> API Tokens.
Here is how it should look like (you don’t need all of those):
Scripts
The scripts we will be using can be grabbed from the aforementioned github repo. We only need the add-key.sh and remove-key.sh scripts. Just grab them for now, and we will see where they go in a bit.
Circle.yml
circle.yml is a configuration file for circle CI that we need to setup. If you don’t already have that file, please create it at the root of your repository.
Now, for the easiest possible solution, I use Shenzhen for build and distribution. Notice the -c Distribution flag is to choose the build configuration we already setup.
You are free to use xcodebuild, xctool, or whatever you wish, but if you do that and still want to leverage Shenzhen distribution, you must also use xcrun to get an ipa file. I will not cover that part, as I will be using shenzhen for everything.
Shenzhen will need a hockeyapp token, and notice we will be using the environment variable we already set in the circle CI UI previously.
dependencies:
  pre:
    - sudo gem install shenzhen
test:
  override:
    - ./scripts/add-key.sh
    - ipa build -c Distribution
    - ./scripts/remove-key.sh
deployment:
  hockey:
    branch: master
    commands:
      - ipa distribute:hockeyapp -m "circleci build" --token $HOCKEYAPP_TOKEN
The Files
Now, copy all the files we covered in this post so you have the following hierarchy:
- ROOT
- circle.yml
- scripts
- dist.cer
- dist.p12
- apple.cer
- add-key.sh
- remove-key.sh
- profile
- blah.mobileprovision
Bringing It All Together
Takes a Deep Breath
In a Nutshell
So, we created all the certs, profiles, app ids, and configured the xcode project with those by adding a new build configuration. Then, dropped those files along some scripts into the repo, configured the circle.yml to generate a signed build, and uploaded the build using shenzhen.
Conclusion
Frankly, using shenzhen is a bit cumbersome since it has tons of dependencies on different distribution platforms, but it is just so darn simple. I will eventually move away from it, but for now it works well.
There might be minor issues regarding ASCII stuff, just define the LC_CTYPE to utf-8 or something, unfortunately I don’t remember why I did that part.
With all that done, you should be able to upload test through circle ci!