This is one of the truly awesome posts that I have been dying to share. Terminal is like the launchpad for developers. It’s where we go to do things. For a while, all I could do is write bash scripts, and then I barely started adding custom commands in the .bash_profile file.
After writing bash commands for a year or so, and realizing that I hate it so bad, and I am barely getting good at it, I decided to go full-fledged python. Every script I write should be in python, whether it was to rename files, or deploy this post online. But how can I quickly write python scripts and make them accessible? Here is how:
The Bad Way™
The way I did it initially was:
$ python
>>> # Python code goes here
Quickly, I realized I am typing things again and again… Not to mention the inability to define and edit functions easily. The lack of autoComplete and accessible documentation was another thing, but some might argue it’s solvable by ipython, which never worked well for me.
Slightly Better
The next immediate course of action was to simply create a directory somewhere, call it sandbox or something, and put the scripts there. The issue here is having to navigate to that directory to run the script, or at least add the full path of the scripts…
Slightly Better + Python
Let’s add some python scripts to the slightly better way, and see how the pipeline becomes simply awesome.
First, we will put all the scripts in a folder, as explained above. In my case, this folder is ~/.pyscripts:
$ ls ~/.pyscripts
blog.py     driver.py  imageutils.py   kptutils.py ...
In my case, blog.py contains scripts that help me manage my blog, imageutils.py, if you haven’t guessed, manipulates images, … etc.
Each script file would have at least one method defined with a cmd_ prefix. For example, here is part of the blog.py file:
...

def cmd_blog_add_images(*image_paths):
    """image_paths: strings
    --- Add an images to the blog so they can be referenced in a post."""

    # simply copy the resources over
    for path in image_paths:
        destination = os.path.join(IMAGES_PATH, os.path.basename(path))
        shutil.copyfile(path, destination)

...
OK… So, we have these script files with cmd_X functions defined, then what?
In .bash_profile, which is executed each time terminal is loaded, we add this code:
# generate and add the python commands
python "$HOME/.pyscripts/gen_cmds.py"
source "$HOME/.pycmds"
Needless to say, the first line executes the gen_cmds.py script. This script generates things (we’ll see in a bit) that are written to the .pycmds file. The second line above “copies” all the contents of .pycmds into .bash_profile. Think of it as a #include ".pycmds" type of thing.
Here is where the fun begins. Look at the gen_cmds.py file:
if __name__ == "__main__":
    # 1 - get the source file list
    all_sources = _listdir_with_path(SCRIPTS_PATH, suffix_filter=".py")
    # 2 - for each source file, get doc and commands
    header += 'echo -e "\n~~~ {} commands ~~~\n"\n\n' + header

    pyscripts = ""
    for source in all_sources:
        # get the list of commands
        cmds = _get_commands(os.path.basename(source))
        # DUMP!
        if cmds:
            pyscripts += header.format(os.path.basename(source))
            pyscripts += "\n".join(cmds)

    pyscripts += '\necho -e "\n~~ end - Generated python commands ~~\n\n"\n'

    with open(DOTFILE_PATH, "w") as f:
        f.write(pyscripts)
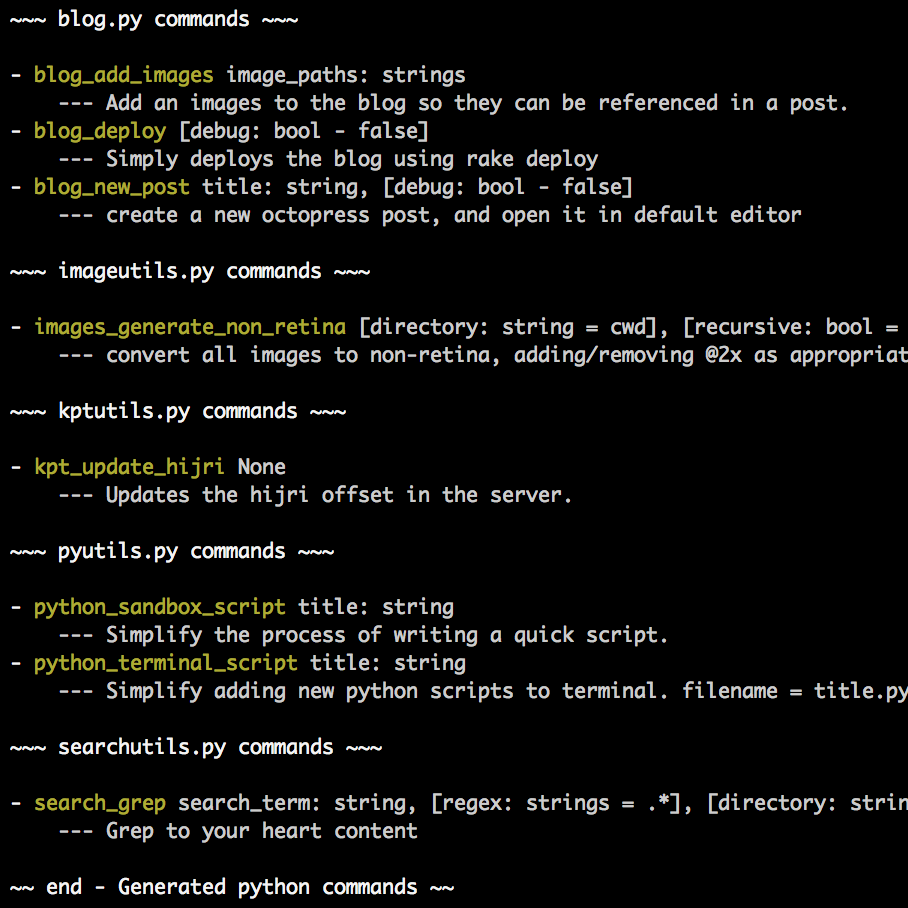
What this simply does is, it iterates all the script files for the cmd_ functions, and write them, with their docs, to the .pycmds file! Here is how the .pycmds looks like:
echo -e "
~~~ blog.py commands ~~~
"

echo "- blog_add_images image_paths: strings
    --- Add an images to the blog so they can be referenced in a post."

alias blog_add_images='python /Users/mazyod/.pyscripts/driver.py --module blog --function cmd_blog_add_images --arguments'

...
Can you see what’s going on here? Other than the echo commands, that simply display the commands in the beginning, it generates an alias with the command’s name that passes the function’s name to a driver.py script, which in turn executes the script! The real beauty lies in the fact that the alias ends just after --arguments. This is what allows us to pass as many parameters as we want to the script!
Let’s look at the driver script, and then we’ll do a quick recap:
import argparse

if __name__ == "__main__":

    parser = argparse.ArgumentParser(description="Give me a module and function, and I'll run it for ya!")

    parser.add_argument('--module', metavar='module name', type=str, nargs=1, help='The module to use')
    parser.add_argument('--function', metavar='function to call', type=str, nargs=1, help='The function to call')
    parser.add_argument('--arguments', metavar='arguments to pass', type=str, nargs="*", help='arguments to pass to the function')

    args = parser.parse_args()

    try:
        module = __import__(args.module[0])
        getattr(module, args.function[0])(*args.arguments)
    except IndexError:
        print("An argument was not provided!!")
Amazing, if I do say so myself! The script adds an argparse, which allows it to take input from terminal. The input is module, function, and arguments. So, it imports the module, uses getattr to fetch the function, and BAM, calls the function with the arguments!
Conclusion
Let’s recap here…
- Add scripts to
.pyscriptsdirectory. (blog.py,imageutils.py, …) - When terminal launches, call
gen_cmds.pyto generate thealiass. - Include the file that
gen_cmds.pygenerates, by usingsourcecommand. - When a script is executed, it’s passed with the arguments to
driver.py driver.pywill fetch the function, pass it the arguments, and voila!